Information on how to build the things that let you go up and down.
Note: Everything here is for U.S. IRC code standards, your mileage may vary…
General Stair code standards:
Here is what the 2009 IRC stair code section says:
Risers and Treads
- Minimum stairway width to finished walls 36″
- Minimum 3′ landing at top and bottom of stairs
- Minimum height from ceiling to nosing 6′ 8″
- Maximum height 12′ 3″ between landings
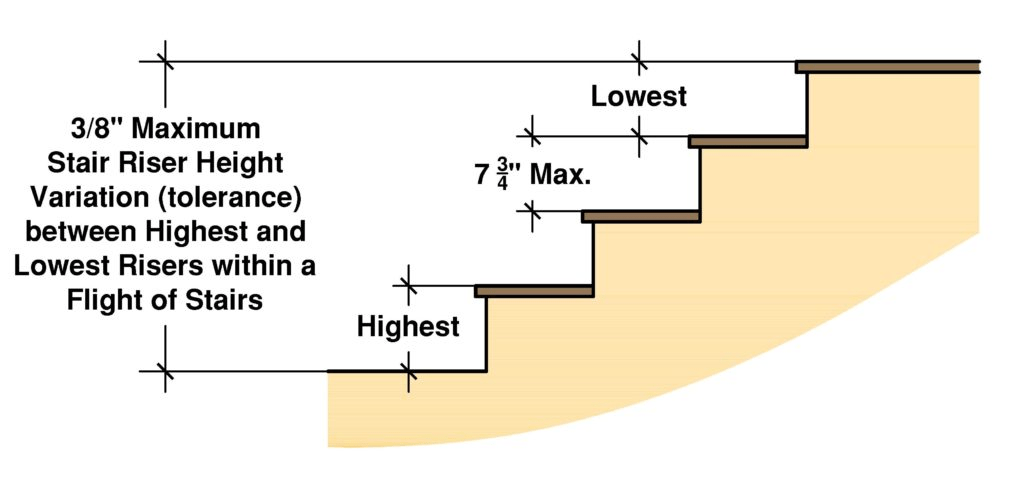
- Maximum 3/8″ difference between highest and lowest stair riser heights between flights
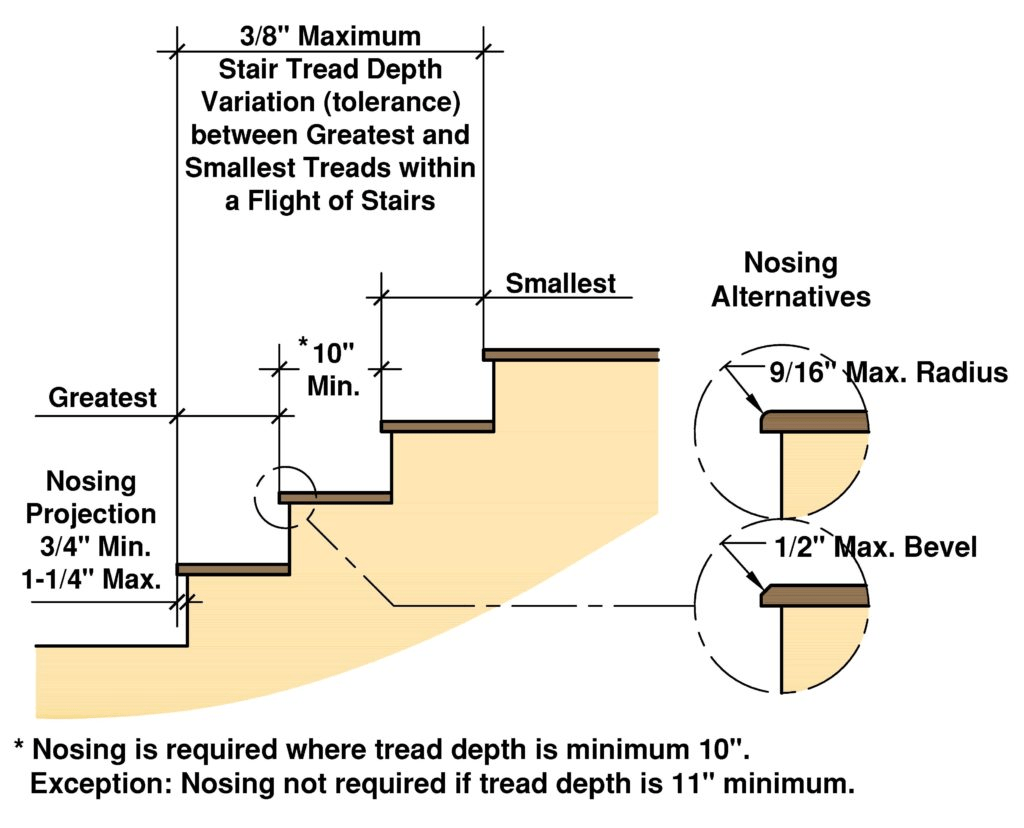
- Minimum runner depth 11″ (10″ if nosing is used)
- Maximum riser height 7 3/4″
- If nosing is used, it must be between 3/4″ and 1 1/4″ in depth, 1/2″ max bevel/rounding
- Nosing also has a maximum 3/8″ tolerance between overall nosing depth, min to max.
Handrails
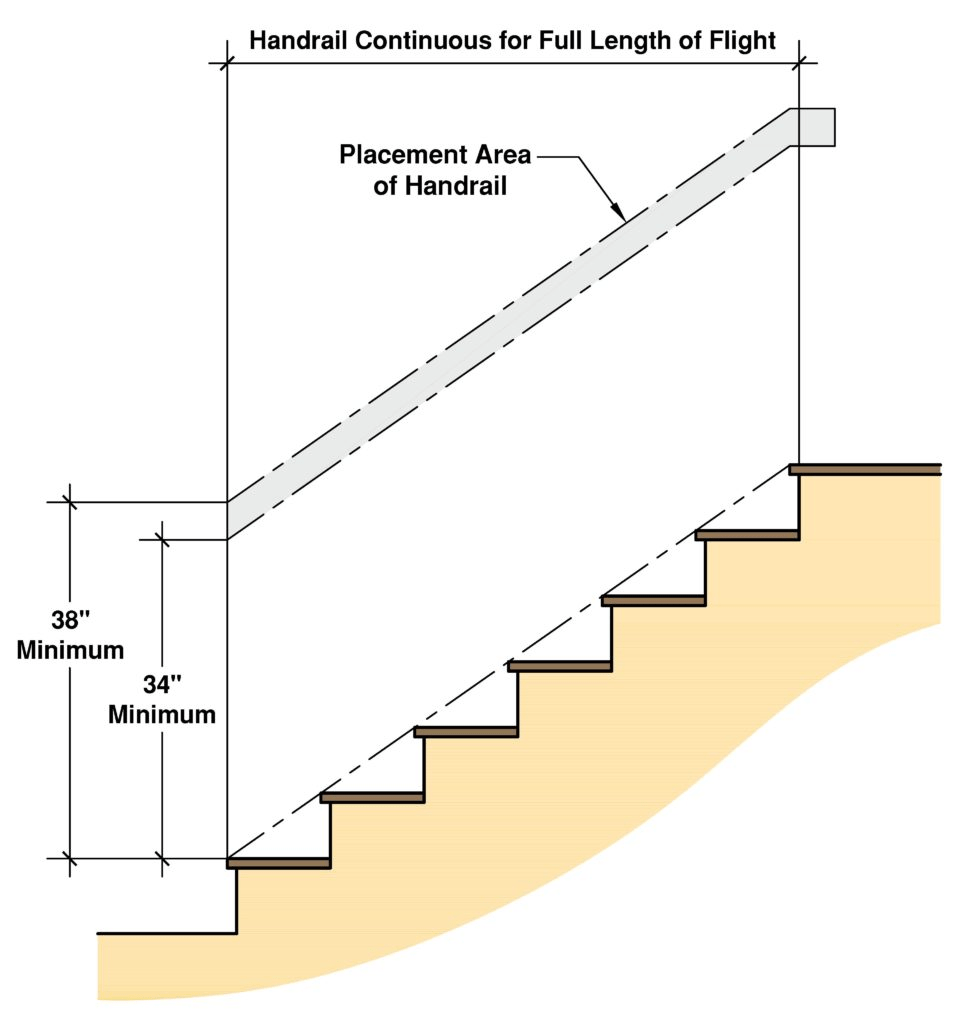
- Handrail height- 34-38″ above stair nosing measuring to top of handrail.
- Handrail strength must hold at least 200 pounds.
- Balusters must be able to support 50 pounds
- Balusters must not be able to pass through a 4” sphere at any point.Handrail projection to be a maximum 4.5″ from wall.
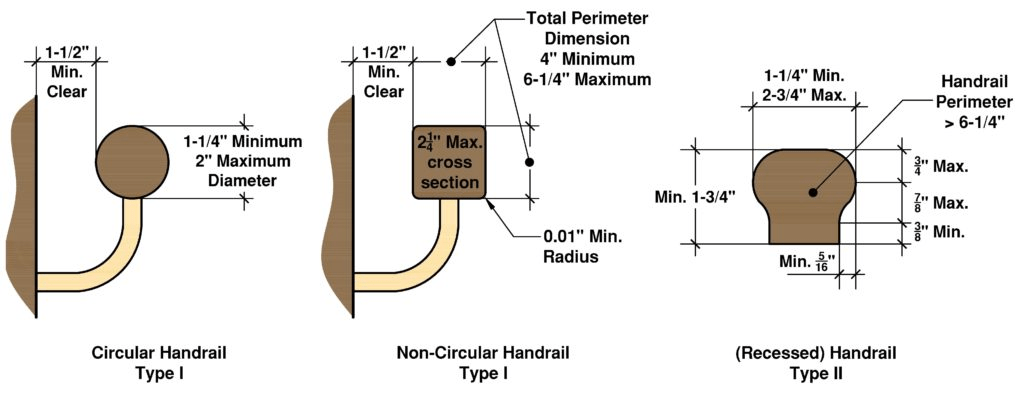
- Handrail between 1.5″ and 2″ diameterHandrail total perimeter between 4″ and 6.25″
- Minimum clearance 1.5″ between railing and wall
- Minimum distance between guard railing and opposite wall is 31.5″
- Minimum guardrail height is 36″ if drop is greater than 30″.
- A handrail on both sides is proven safer in an emergency fall situation, but is not required.
- Gripping surface must be continuous without interruption for each flight
- Handrails may start on the first step in residential buildings. (Commercial must start at landing.)
- Ends of the handrail must be returned to wall or have rounded terminations.
Construction
Finishing
Here is a link to Laying out railing balusters with elastic band. I haven’t tried it but it seems clever.
Installing Risers and Treads
Remember to plan out the order of events before cutting any boards. Make sure that your newel posts and treads and risers won’t interfere with each other by installing them in the correct order.You may want to plan out the entire trim job when doing stairs in a cad program (Sketchup works well) to make sure you don’t get stuck on anything complicated.
You can also pre-finish the treads and risers before installation and then only need to do touchups after install.
Risers
- Install risers first, using a block on top of the rough treads to ensure that the treads sit on them well.
- Rip risers to approximately 1/8” less than the rough riser height to allow for errors.
Add approx 1/32” to 1/16” of material to the part of the block that will be resting on the tread (or remove that much in front). This leaves the riser just slightly higher than the rough tread to ensure a tight fit after the adhesive layer is applied. - The top and sids of risers should be beveled 5° away from the finished surface to allow for adhesive squeeze out.
- Cut to length using a stair cutting jig to get a perfect pressure fit against the skirt board. This will account for any irregularities in the plumb of the skirt boards/wall potentially causing you to need to cut at an angle. A short track saw is ideal for this, but if you take your time you can finesse a good miter saw to do the work. Just pay strict attention to what the miter setting should be for each and every cut.
- Ensure that the jig is aligned to the bottom of the riser when marking.
- Mark cut line using a utility knife for a clean mark and cut up to the line for a tight joint.
- Make sure you spend the time getting the jig aligned tightly to the skirt board for a good fit. You may need to do each side twice depending on how straight your skirt board is. There should be no gaps anywhere.
- After the cut, run a sanding block very briefly over the ends to remove any roughness.
- Install with generous amounts of construction adhesive – PL Premium is many times stronger than Liquid Nails.
- Use 18 gauge 2” finish nails along with the adhesive to secure risers to stringers.
Treads
- Rip the treads to width using a 5° back bevel away from the finished surface to help with glue squeeze out and ensure a tight fit to the riser.
- Make sure that the jig is well placed and transferred accurately.
- Unlike the risers, keep the ends of the treads where they meet the skirt boards at 90°. Remember to reset your saw!
- Attach the treads with ample adhesive as with the risers. Place adhesive in the areas according to the video below.
Installing hardwood treads and risers
Here is one newel post attachment option: Sure-TiteTM Newel Post Fastener. Plug holes after.